Dynamic load balancing for WebSockets using SocketIO and Traefik edge router
Maintaning a web socket connection in replicated services on the cloud does not work out of the box.
As long as there is only one server holding all the web socket connections things work just fine but once we move try to scale the service by creating replicas then even a simple websocket application seems to fall apart. Let us look at the problem in a little more detail.
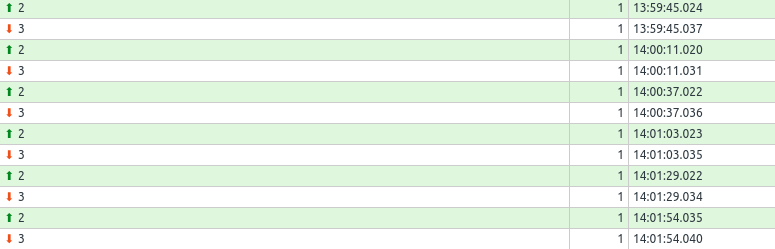
When you connect to a server using socket io client there is a bidirectional channel that is established between the client and the server and in order to keep the connection alive the socket client sends a small ping packet every so often. This interval is set to 25s by default and you can change this when you are initializing the websocket connection on the server.
1 | |
You can go to the Network tab of your dev tools and find the ping packet. Here’s how it looks.
Now when you only have one socket io server there these ping packets reach fine and the websocket connection is still intact.
But if your server has multiple replicas then then it is not necessary that the ping packet will reach the same replica everytime and even the client and server will never be able to establish a permanent socket connection.
And after the ping interval the client might send the packet to the second replica
The Solution
The obvious solution is some sort of a sticky mechanism that makes sure that the ping packets and the socket data are sent to the same server always. If the client sends the first packet to the first replica then all the subsequent packets should be sent to the same replica. We are going to use the traefik proxy in order to achieve this. It is a loadbalancer that can act as an API gateway, manage certificates, act as a kubernetes ingress and much more. In this scenario we are only going to use it for sticky loadbalancing. I am going to demonstrate the concept in Docker swarm mode with sticky session enabled. Below is a basic arch diagram to represent the components
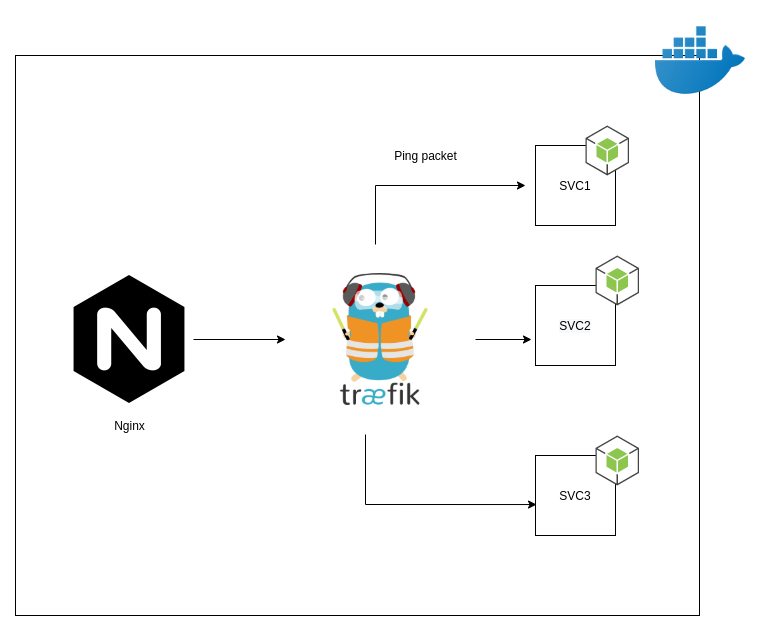
Now using two API gateways might not make much sense in a real world scemario and technically you can use only traefik as your main gateway if you are building your services from scratch but assuming that you already have a primary loadbalancer and you only require sticky sessions for socket io containers this arch is more suitable. Traefik acts as a secondary reverse proxy only for the required services.
The chat server is a small nodejs server built using express js and socket io for websocket connections. The application is a minimal chat application that is hardcoded for two users who can send text messages to each other using socket io. Express js sets up the routes required to serve the files. jQuery is used in the frontend app and there is a simple chat interface to illustrate the concept. Without the presence of traefik the socket session will not be established and the users cannot chat.
In order to replicate these services I am using docker swarm and deploying 3 replicas. Your application can have any other container orchestration platform and the configuration will be modified accordingly.
Traefik configuration
We are using docker provider with swarm mode and the compose file is version 3 and it contains 3 services viz. the chat application, nginx as the primary api gateway and traefik for sticky sessions. Let us look at the traefik part first.
1 | |
I have named the service as loadbalancer. Make sure this is mentioned in the nginx conf file mentioned below. As of writing this blogpost the latest stable version of traefik was 2.4 and we are using the official docker image for that. Since we are running locally the insecure flag is set to true otherwise it should be set to false. Both the providers params are very important and this helps traefik to indentify that we are using the docker provider in swarm mode. Next we are mapping the http and the dashboard port, you can assign them as you wish. Also, traefik needs to be deployed in the manager node hence the deployment constraint is set to manager here.
Next let us take a look at the socket service config.
1 | |
There are a few labels for our sample nodejs service and they act as configuration for the traefik proxy. After the enable flag we have two service names (service-socket, service-socket-poll) and they point to the service name above (line 1). Here you can find the reason as to why the router definition has a service target. Next is the loadbalancer port that points to the service port. The router rules are very important and they are the ones that route the traffic to our service. Here we have two different services for two routes as in case of overlap the second configuration overrides the first one and we lose the /sticky route. These routes are mentioned in the nginx conf that we will see below.
The last label is perhaps the most important one as this specifies the session to be sticky and attach a cookie to identify the exact service replica.
Below is the config for nginx.
1 | |
The above part shows the configuration for the nginx service that is the main proxy for our example. It is very minimal and is deployed on the manager node. Let us also look at the nginx conf file
1 | |
We have defined an upstream node that points to the loadbalancer service in our swarm. The server block is only configured for http and the proxy headers inside each location block are for the websocket connection and to make sure that nginx allows connection upgrade requests.
The NodeJS socket service
For this demonstration we are using an express server that also has socket io configured with two handlers for listening to simple messages. The code for that service can be found here.
├── app.js
├── chat-client.js
├── chat.html
├── Dockerfile
├── index.html
├── main.css
├── mypage.html
├── package.json
├── package-lock.json
├── socket.io.js
└── trench.ttf
The app.js file contains the server side code and the chat-client.js is a small js file for handling chats and socket messages in the front-end. The chat and the mypage html files represent chat windows for two users and they can send text messages to each other.
Putting it together
Let us build the nodejs service and the nginx service and generate docker images. You can clone the repo from github
cd service-socket
sudo docker build -t service-socket:latest
cd ../nginx-proxy
sudo docker build -t nginx-proxy:latest
Initialize the swarm
sudo docker swarm init
if you want to add more nodes to the swarm then use the docker swarm join command and specify the token obtained from the above command. More on that here.
Deploy the stack using the swarm/compose file that is present in the root dir of the project
sudo docker stack deploy -c docker-swarm.yml sticky
The name “sticky” is the name of the stack we deployed. Wait for a couple of minutes so that all the services are up and running. You can check that using docker service ls command. Navigate to localhost:8000/sticky and you will see the index page loaded. Open another tab and navigate to localhost:8000/sticky/mypage and that will open another window. If you open dev tools on either of that pages and go to the network tab then you will not see any errors and all the ping packets will be sent correctly. Feel free to look at the request headers and you will notice the cookies being sent. You can also view the traefik dashboard at the 9090 port. It displays the routes and the services and you can verify if the routes are correct and are pointing to the right service.
If you are using the 1.x version of the traefik proxy then use this swarm file instead. If you want to delete the stack the use
sudo docker stack rm sticky
The above implementation is just for demonstrating the concept and is not production ready by any standards. The complete codebase can be found here.